An inquiry we receive quite regularly from parents of newly turned teenage drivers is, “what might the safest possible option for my son/daughter be when it comes to cars on the road?”
A fair question, but not an easy one to answer. Unfortunately, you’ll most often receive equally as many answers as people you ask. For that reason we’ve decided to do a little research, and the NY Daily News recently published an article that appears to be relatively consistent with our findings. Mind you, this is taking into account a brand new vehicle purchase. We don’t necessarily feel that’s your best option, but if that’s the direction you’re leaning this list may prove to be quite helpful.
Alternatively, there’s a quality pre-owned vehicle. The majority of people, we suspect, will fall into this category. These days most vehicles are trustworthy. The key is to learn how many owners there have been of each specific vehicle, whether or not there have been any accidents, if the routine maintenance has been performed, and if most of the miles were highway or city. These four criteria form a sounding board for becoming a wise consumer when purchasing a new (to you) vehicle.
Whichever you may decide, we recommend your son/daughter first spend adequate time with your family vehicle, if for no other reason than to become familiar and confident with the ways of the road. Of course, these days kids are required to spend a certain amount of time practicing, and in some areas actually cannot obtain their license without first attending a driving school. No matter the degree of prerequisite training, make sure they’re well versed on safety guidelines and what it takes to become a defensive driver.
With most recent events in Kentwood and Wyoming Michigan, it stands to reason we should review how to properly respond to inclement weather while driving. Thankfully, the American Red Cross has already gone to the effort of making simple to follow instructions.
Might go without saying that the safest possible position would not be to operate a motor vehicle during a major storm, but if you must these are very important factors to keep in mind.
Error on the side of caution, always. It’s not worth risking your life, or perhaps somebody else.
Imagine our shock when a Grand Rapids police officer entered Community Automotive Repair last month, specifically to inform us a stolen car was in our lot. Now, consider our response when we were informed the vehicle in question was from our own low-cost rental fleet. I (Calvin) can’t vouch what my colleagues might have been thinking, but almost immediately my mind shifted to “How would you know?”
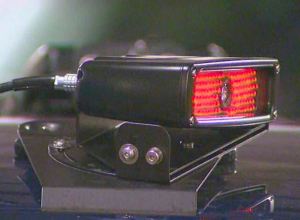
To answer that question, we take a closer look at new technology being used in our own backyard – the license plate reader. Some of GRPD’s vehicles are equipped with this device, which gives them very quick analysis of any unpaid parking tickets, violations, or pending warrants associated with each specific vehicle’s license plate. After only being in place a short time, this recent addition to the police force has helped recover nearly $50,000 and over a half-dozen stolen vehicles. We’re sure those numbers are even greater today, as there’s been a steady incline in results.
However convenient these resources may be for the police and City of Grand Rapids, they’re of course not met without controversy, locally and across the country. An article found on WoodTV8 online suggests the most recent party to object is the ACLU, but it’s fair to say they’re not acting alone.
How do you feel about this issue? Is this somehow an invasion of privacy, or do you consider this process necessary for our community?
For those of you wondering, the officer was responding to a legitimate incident from 2012, only the record had not been updated on their end. We unfortunately did have a young man and his friends take one of our cars for a morning joyride and leave it abandoned, only the plate on that vehicle was then transferred to a different one altogether. When that change was made, the Secretary of State files didn’t make it back to the Grand Rapids Police Department. Needless to say, it’s all handled now and there’s no additional room for concern.
Seems these modern forms of discovery are slowly becoming more common place, but please do let us know where all of this information lands for you. Do you stand opposed, or are you in support of this method being used to retrieve data? In several ways, this is merely an updated process that’s been made more visible in light of the plate readers themselves, which are easily detectable from their mounted position on the police cars. (pictured above, compliments of MLive) But in other ways, this latest development has some people feeling uneasy. Are you one of them?
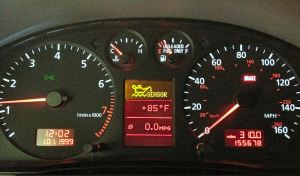
That yellow oil can indicator light pictured above is often overlooked, but may actually be more important than you realize. Not all vehicles will of course have this digital display, usually depending on its overall age. However, whether or not you have an analog arm or a high-tech full color instrument panel, what your engine may be trying to tell you is it needs a drink of oil, among other possible things.
Typically a vehicle will require additional oil between oil changes as it becomes more “seasoned.” In other words, if you’re having to add up to a quart of oil every now and again prior to your next oil change, it might just be par for the course in older vehicles. This doesn’t necessarily mean it’s time to replace the engine, or the vehicle itself. Engines can operate under these terms for many years and thousands more miles, so long as you don’t mind the potential inconvenience of having to remember to add oil, you’re most likely not going to run into any related concerns. Disclaimer: your oil pressure level may also be associated with a more significant issue, proper diagnosis is necessary to confirm.
Having said that, we want to make sure you know how to correctly check your vehicle’s oil level. You will want to do this only after the vehicle has not been in operation for at least 15 minutes, but preferably prior to the first trip of the day, while the engine is cold.
Another installment in our Back to Basics series, this will break down in very simple steps what’s necessary to complete the task at hand. Tools/items required include the following: a shop rag (old t-shirts work great here, cut them into strips – cloth/rag should be lint free), 1 quart of your preferred oil (see your owners manual if you’re not sure what oil type to use).
First, you want to locate your vehicle’s oil dipstick. Some European vehicles do not have them, but most others do. If yours does not, consult your owners manual for detailed instructions on your specific make/model. Most of you will see a relatively large rubber ring, often yellow in color. That’s the top end of your dipstick. If you’re to pull that out (and you will in a moment) you would see a long thin metal stick-like instrument.
Pull the dipstick out of its barrel, and then wipe it completely dry. Re-insert the dipstick and seat it firmly for a few seconds. Lastly, you’ll want to pull out the dipstick again, only this time don’t wipe it dry. Once you have the dipstick removed, use your other hand to hold it level (horizontal with the ground) so you can get an accurate reading. There are two indicator lines you’ll want to make note of to get a proper reading (usually easily identifiable with “ADD” or “FULL”). If the oil line on your dipstick is at the full line – wipe it dry, re-insert into barrel and you’re done. If, however, the oil line is below the full line you will need to add oil.
Oil is not to be added through the dipstick barrel opening. Usually there’s a rubber or plastic cap somewhere near the top of the engine (manufacturers don’t generally try to hide this one on purpose) labeled Motor Oil, or something of the like. You’ll unscrew that cap and add motor oil accordingly. The only thing you want to keep in mind, and this is VERY important, do NOT overfill. What this means is you should add oil slowly and repeat the oil level check process detailed above until your oil reaches the full line on the dipstick.
Remember, those lights on your dash (where applicable) are usually attempting to communicate with you. Please take notice of when they’re illuminated. Check your owners manual for what each might mean, or feel free to contact us with your questions. We’ll be here when you need us.
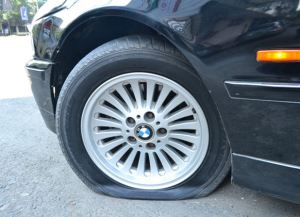
In our second installment of Back to Basics, we want to briefly focus on a skill that could end up being (if it’s not already) very important – fixing a flat tire. Many of you may already know what this entails, but we don’t want to take anything for granted. Simply follow these steps and you’ll be on your way in record time:
If your flat tire happens while moving, find the closest and safest place to the side of the road (preferably as far away from oncoming traffic as possible) and park your car. You may benefit from using your emergency hazard lights, to notify nearby drivers and increase visibility.
A step often used but not entirely necessary is opening and leaving your trunk or hood up, to signify a repair in progress. If it’s dark and you have them available, emergency flares are most preferable. At this point you’ll also want to “chock” the 3 remaining wheels with large rocks or an equivalent. This is in case your e-brake or transmission malfunctions. Not likely both will fail, but possible. Remember, better safe than sorry.
Engage your emergency brake (again, often overlooked but definitely most safe practice).
Remove your tire repair kit from the vehicle. Most manufacturers locate these in the trunk, but not all. Also, kits vary but all should have the basic essentials necessary for changing to your spare tire.
Locate your lug-nuts (some vehicles may require hubcaps to be removed first but many allow access to your lug-nuts without removal). With the lug-nut wrench from your tire repair kit, loosen (but do not remove) all lug-nuts on the wheel. This is where the age old adage “Lefty loosey, righty tighty” will come into play, we’re sure you remember that one.
Remove the jack from your tire repair kit and position it on a stable part of your vehicle’s frame. This “jack spot” is located in different spots depending on the make/model of your vehicle, so you’ll want to consult your owners manual for best positioning. You only need to lift the vehicle high enough for the tire you’re removing to be an inch off the ground.
Now, it is safe to completely remove the lug-nuts you loosened earlier.
Gently slide the wheel off your axle and place it in the trunk, replacing it with your spare (which you SHOULD have). If you don’t have a spare, every step up to this point will have been done in vain, unfortunately.
Make sure you install the spare tire in the proper direction. You might laugh but it’s easy to confuse. Best thing to do is keep the valve stem (part of the tire that accepts air) to the outside.
Like riding a bicycle for the first time, once you’ve completed these steps you’ll not likely forget. We hope recall of them is not necessary multiple times, but should that be the case, you are now better educated and empowered to handle the situation.
No matter how long you may have resided in a colder climate, there are a few key components to safe winter driving we always recommend. Fortunately, the team at AutoNet TV released a video in collaboration with Bridgestone Winter Driving School in Steamboat Colorado, where they highlight these critical tips.
Here in Michigan (at least thus far) the season has been fairly mild, but if you pay attention to the video it confirms that sub-zero temperatures don’t necessarily mean more difficult driving conditions. To that end, we’ve seen our fair share of 30 degree days, flirting with that freezing point that still maintains moisture. Whether on the most unsafe or virtually hazard free roads, safe driving is a learned skill.
We hope this short video provides some helpful insight for your defensive driving efforts. Stop by and see us if you have other questions.
If you are a “just the facts” type person, feel free to skip down to the instructional video, compliments of Automobile Association. Otherwise, sit back, relax, and inquire within.
When you’re talking about changing wheels on a vehicle, the answer to the subject heading is “sometimes, more challenging than you may realize.” Full disclosure, I (Calvin) am not a technician, nor have I ever been. We have a highly qualified team of professionals available to handle those services. I, on the other hand, specialize in business development. Suffice it to say, you don’t want me anywhere near your vehicle in a mechanical sense. That’s why they do what they do best, and well… you see where this is going.
I came to this blog entry because we recently had a customer experience at our shop that was not too favorable. Truth be told, we aim for 100% satisfaction and missed the mark on this particular repair. Not unlike most/all of you, we aspire to learn from our mistakes, to keep from potentially repeating them. My personal experience with changing wheels/tires has thus far been limited to the very irregular (thankfully) flat tire on the highway, or equally unusual swap due to road hazards. Call me lucky but thus far the Michigan roads haven’t added any of my vehicles to their casualty list. Anyway, point being, I had little to no idea how much detail and information is important when it comes to properly changing wheels, especially in terms of tightening the wheel nuts (known to most as “lug nuts”). To that end, and following our brief misfortune, I’ve taken the opportunity to do a little research and learn more about this service process. This led to quick discovery of exactly how much information there is to be found on this subject. Let’s just say there are several opinions but consistency across the board in how this is not necessarily a simple fix, at least not without keeping a lot of factors in mind.
OK, so for those of you (like me) who didn’t realize there’s more to this than meets the eye… let’s learn together.
First, improperly tightening your lug nuts when replacing a wheel may cause warping of the brake discs, in turn potentially forming uneven wear. This condition is what’s referred to as Disc Thickness Variation (DTV). What actually happens is you’ll receive a pulsating brake pedal as a result of uneven brake disc wear, mainly due to disproportionate force. Read this as a terribly annoying vibration under your right foot. Have you felt this?
One method of eliminating possible DTV is following specific lug nut tightening protocol. Tools you’ll require include a socket wrench with the proper size socket, an approved object to chock the wheel (keep it from moving off the jack), a jack, possibly a socket extension (depending on the depth of your lug nuts), a torque wrench, and grease.
Once you have those items available, here’s the approved method for this service:
1. Assure that your vehicle is in park, or engage the emergency brake on manual transmissions. Place your wheel chock object diagonal from the wheel you’re working on at the moment. For instance, if you’re servicing the driver’s front you’ll want to chock the passenger rear. Repeat that same chock pattern until all four wheels are complete. Loosen the lug nuts using the socket wrench and the corresponding socket, only don’t remove them yet.
2. Use the jack to raise the vehicle off the ground. Make sure you’re contacting the jack to the vehicle in an approved position to avoid possible injury. Remove the lug nuts and slide the wheel toward you, away from the wheel studs. Keep all the normal safety in mind when lifting the wheels as they will likely be heavy.
3. This is where several people cut corners and to avoid possible danger, do not let this be you. The wheel at this point requires thorough inspection. What you’re looking for is possible damage to the rim, tire, (including a check of the actual tread depth), as well as all the brake components normally hidden by the wheel. Most excessive wear will stand out but not necessarily. Be sure to look carefully and take your time. CLEANING is the last part of this step, and we can’t stress this enough. You want to create as clean and flat a surface as possible, as this is where the metal-to-metal contact will take place. Any excess debris left unattended my lead to premature warping, or worse yet imminent danger. Best advice we can offer here is to make sure the mounting surface on the wheel AND the brake disc are very clean.
4. Apply grease on the wheel studs to keep them from seizing. Please keep in mind there’s a common concern this might promote the lug nuts to later come loose. Actually, this is not true. In fact, you should also apply grease to the lug nuts themselves. You do not want these to bind. One of the worst (and unfortunately most common) mistakes is to use the wrong amount of grease and cause your torque wrench to improperly read the wheel.
5. Almost finished… just need to re-apply the wheel in the proper position and tighten. Only there are a few small details to keep in mind. It helps to align the wheel and the wheel studs prior to lifting the wheel, again because safety is most important. Doesn’t take much to throw out your back if you do this wrong. Once you have the wheel on the wheel studs, install the lug nuts with your hand, or it may help to use the socket fitting without the wrench. Check your vehicle’s owner’s manual for the correct torque setting on your wheels. This is NOT universal and assumptions here can be very disastrous. You want the exact amount of pressure it calls for, no more and no less. As you can imagine, there are potential hazards for either case. Set your torque wrench accordingly and LOCK the setting.
6. Last step, and this is one of the most important. Tighten each lug nut with the amount of torque your vehicle specifically indicates, but only do so in a certain pattern. Let me say that again, do NOT just start at the top and go clockwise. If your wheel is upright and it resembles the 5 points of a star, number them sequentially from top to bottom (clockwise), 1-2-3-4-5 and follow this tightening pattern (1-3-5-2-4). If your wheel contacts 6 studs use this pattern instead (1-4-2-5-3-6). Keep in mind that SLOW tension is best. Torque to the specified setting but do not do so quickly. Slow and steady wins this race, so to speak. Lastly, be sure to go around the pattern a second time and check to make sure a lug nut wasn’t missed. Repeat this exact process for the other 3 wheels, remove the jack, and drive away safely.
The most important rule is to SLOW DOWN and don’t be distracted while driving.
Follow school buses at a safe distance, they make frequent stops.
Yellow flashing lights indicate that the bus is preparing to stop to load or unload children. Motorists should slow down and prepare to stop their vehicles.
Red flashing lights and extended stop arms indicate that the bus has stopped, and that children are getting on or off. Motorists must stop their cars and wait until the red lights stop flashing, the extended stop sign is withdrawn, and the bus begins moving before they can start driving again.
You must stop in both directions when approaching a bus with Red flashing lights. This is commonly overlooked.
Traffic Enforcement officers will be monitoring school traffic to prevent pedestrian related accidents.
Watch for children arriving late for the bus stop who may run into the street.
Pay particular attention to children walking where there are no sidewalks.
Take extra care when entering or exiting driveways.
Beware of children darting out from between parked cars.